29 May 2011

A Summer Hat for a Wizard, Part 3 (Finale!)


Three times is the charm, apparently.  I completed the straw hat I've been working on for the Headmaster character of the Summer Wizarding Event.  The first version (see Part 1 here) was of yarn and was a work through of a 1970s era pattern for a children's cap.  I was able to work out the height for the crown and the shift in stitch direction at the base to make the brim stick out perpendicular to the hat proper.


The second version's making (see Part 2 here), wherein I switched over to the rayon-raffia fiber for the actual hat, revealed a few problems: the stitch count looked different in the stiffer, less flexible raffia which led me to wing it as far as counting, to not great results: the hat looked more like an old gourd!  It also looked too pointy, something the headmaster actor wanted to avoid.


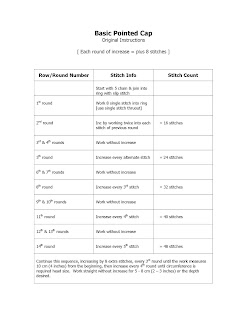
For the final version, I took some time beforehand to work out the entire stitch sequence on paper (the original pattern only went up to Round 15, the size that worked for a child's head size). I went back to the original stitch sequence and also decided to switch up hook sizes, from an F hook to a G hook.  It made the stitches larger with the happy result of also making the very top look more rounded.


But once I got to the lower edge, and did my little trick of a row of slip stitches to make the brim stand out at a 90 degree angle . . .  I realized I had no pattern planned for the brim itself.  I'd recently made myself a very large, flat beret and thought I recalled the stitch sequence.  Wrong!  What I did made the brim look like a large, floppy ruffle: not headmasterly at all!  So I did some Googling, found some free patterns that showed hats with brims, and studied their instructions.  Went back to my hat, counted the stitches at the bottom, did a a few calculations, and then took the time to write out the entire sequence of rounds.

(Note to self, just because you like to freelance stitch, doesn't mean it will work for every pattern!  In the case of a pointed hat with a perfectly round brim, numbers matter)

The Headmaster actor had also requested that the brim be shape-able.  So along the very outer edge of it, I crocheted around a length of phone wire I'd dug out of one of our workbench boxes.


I used an old cotton tie-belt for the inner head band.  It was nice and soft from use which made it comfortable. I stitched the Headmaster's last name onto it with straw-colored thread. Finally, I completed the hat with a band made from a child's old leather belt I'd found at Goodwill (shortened and with new holes punched in so that it the hat could be fitted -- The raffia turned out to be a little stretchy.  The fit of the hat changes.).

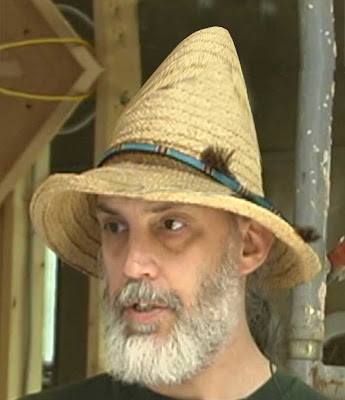
I am especially pleased with the results.  I managed to make something that looked exactly like what was in my imagination (and the actor's!).  Here's the photoshopped pic the actor sent of his original conception.


And here he is as the Headmaster with his new Summer hat! 


~~~~~~~~~~~~~~~~~~~~~
Note: The pattern I used is included in the Part 2 post on the project. By the final row I was increasing every 24th stitch.  The brim info is not present but can be inferred from the "Brimmed 'Straw' Hat" at the Lion Brand Yarns free patterns collection.


28 May 2011

Magic Contained


Ollivander's Wand Shop at The Wizarding World of Harry Potter 
at Universal Orlando

An important day for a new wizarding student is the day she/he gets her wand.  In the movies, one goes to Ollivander's Wand Shop, where the wands lie in boxes stacked to the ceiling.  In our Summer Wizarding Event, where our space is small and, more importantly, we are creating our own wizardly world; selecting a wand will have a more personal aspect to it.

I've promised not to show specific/identifying pics until after Event Day (which is in July), so I cannot give a lot of details yet about the wand ceremony.  But I can say the wands are being hand-crafted on the lathe by my brother WoodCrafter.  And instead of a box, each wand will have its own lined, velvet pouch accompanied by the business card of the Wand Maker.

Here's the design I made in Word (using an image of a wand I found on Google Images):


And here is the first wand pouch, hot off the press, er. . . sewing machine. ;-) (The fabric I used for them was a remnant piece that was several yards long but only 6.5 inches wide.  So the wand pouches are a little skinnier than I would like them to be!)  The dowel in the pics is just that, a wooden dowel.  The wands themselves will be much fancier.


24 May 2011

Stamp Cabinet for Fictional Post Office


One aspect of the Summer Wizarding Event is a Post Office.  We are still working out how it fits into the narrative of the day, but the idea of our new students receiving mail and being able to send some has got us pretty jazzed.

I am big into letter writing myself (what a surprise!), and have a very neat cabinet given to me by my Beloved Spousal unit that is designed for storing one's stationery, stamps, labels, and such.  Recently on a run to Goodwill I came across a similar-looking cabinet.


I've modified it by painting the logo of our Postal Service on its doors and antiquing its entire inner and outer surfaces it with "Ancient Gold" "Rub-n-Buff Metallic Finish."  The postage stamps in the image below are real (old) U.S. stamps in 3-cent denomination.  Professor Science donated them.  Besides being used as postage for the fictional mail the kids will be receiving, there are enough stamps for each kid to receive their own small stamp set as part of an informational brochure they'll be getting (and I will be authoring) on How To Create A Fictional Correspondence.


The postal scale is something I found on eBay.  It's a bisque-colored plastic.  I haven't decided yet if I am going to paint it or leave it as is (I actually use it, so I'd want to be careful about using something that might damage the surface.)


20 May 2011

Post Office Makings


I won this old post office letter scale on eBay.  I need one for my letter writing, but I will also be lending it to the Summer Wizarding Event folks to use in their Post Office. 

As I begin to gather such things together, the postal props making for the event is becoming so much more real and exciting.  Up to now -- except for the making of the monthly newsletter -- it's been mostly planning in sketchbooks or collecting image files of ideas.  Recently though, Professor Science generously offered a bunch (majorly large bunch!) of old postage stamps.


And yesterday I was at one of my favorite stores, American Science and Surplus.  Oh my, if you haven't been to their store or gotten their catalog, DO!  They are the wildest bunch of characters and sell the coolest stuff.  My find yesterday was just what I'd hoping I'd find.  I wanted to include a letter opener in each wizarding student's packet of mailThe kind I had in mind was one of those sliding ones with the blade safely enclosed.  I'd priced them out wholesale online and found it would cost about $1.35 per opener; a little pricey for our limited budget.


What I really wanted, though, was one that looked more like the classic mini-dagger.  But handing out knives to children isn't the act of a responsible adult! :-)  So I was totally psyched to have come across these 10 cent apiece plastic versions (below).


The packaging envelope above it (and pointed to in #3 below) I made using a template from Ruthann Logsdon Zaroff's creative and generous site, Mirkwood Designs Templates.  I used her Artist Card Envelope, which I stretched out to fit the size and shape of the letter opener. 

(1) below shows the unassembled envelopes and (2) the letter openers.


I recently heard from the Headmaster Actor to whom I'd sent a sample packet. He pronounced it "truly excellent"! Next up, the Stamp Cabinet for the Post Master/Mistress.

16 May 2011

SENT OUT: Postcard to Europe


It's been awhile since I've posted one of my fictional postcards.  This one went to some friends of mine who live in Vienna.  The real recipients are both musicians, so this image (with added stickers!) seemed appropriate.


TRANSCRIPTION:
Dearest T-Rack and Shamilar ~

The concert last night was splendid!  I so wish you could have been there.  The duet with Crazy Annie and the Duotone Jazz Swans was funky, profound, and insanely received by all. They didn't hit the stage until 2 A.M., though -- by which point the band was fading fast.  But they hung in there! Brought down the proverbial house! 

Rock on! 
Dixon III


10 May 2011

Character Building


Image and text from The Orlando Sentinel: "One of the galleries of talking wizard portraits inside Hogwarts Castle, on the way to the Harry Potter and the Forbidden Journey ride at the Wizarding World of Harry Potter, at Universal's Islands of Adventure in Orlando."
The Summer Wizarding Event is proceeding in increments.  Last weekend, we had another planning meeting to draft an activities timeline for the day and chat about other concerns.  One is who people are going to be: the characters or personas needed for the story to work.  

Due to various constraints of the life and time variety, I will not be able to play a role on the actual day of the event.  I will be present, however, in a most playful and imaginative way.

The event is being styled as a new student orientation for this year's incoming class at a Hogwarts-like school (but one set in the Midwest). Part of the set decor will be moving portraits of wizards and witches gone by.  I got to see a prototype of one during the planning session.  

This prototype -- which involved a computer screen within a picture frame -- had a looped video running, nothing fancy, just some footage of a man eating his lunch. What made it so convincing, though, was the workmanship of the construction, the quality of the picture frame and matting, and the composition of the imagery and lighting. 


These "talking portraits" from the Magical History Tour exhibition at Merseyside Maritime Museum in Liverpool, England are the kind of thing we have in mind.  A video of these gentlemen in action is located at this link.

The prototype's designer mentioned the need to have some "real moving portraits" made up for the event.  I thought I might be able to come up with something.  Fortunately, there doesn't have to be any sound; just an old-style silent movie about 5 minutes in length. Here's what I've got so far in terms of garb and personal ideas.

 Antique crocheted caplet (made by an ancestress of my Beloved Spousal Unit)


 Several Wigs 

Character 1 is to be a Lady Bard, tuning a guitar and "composing" a song.  These are some of the images inspiring the look and 'plot' of her actions. 


This silk-like jacket (Laura Ashley designer item found at Goodwill for $2.50!) I will repurpose into a fitted bodice. My plan is to make it sleeveless with with snaps along the sleeve-line so I can wear different sleeves for different looks.


Love them Goodwill drapes!  This green cotton will be made into your standard issue, floor length gathered skirt.


Character 2 is to be a cartography or astronomy scholar/professor reading and taking notes with an ink dip pen.  These two paintings by Vermeer are the inspiration.  My costume, though, will be more Renaissance and more garish.


I have an academic gown and a wonderful multi-cotton, much embroidered coat with very similar lines.

 
And my professor will be wearing a ruff. Nothing quite as polished as the image below, but about this size.


(1) below is the wired ribbon and cord that I will use for making my ruff. 


Miz Professor will also be wearing a rather ostentatious medallion on a chain.  (2) above shows the chain I bought at World Market from their clearance section, the sun object for garden decoration, and the shiny brass Krylon paint I will be using to make the sun match the chain.

Characters 3 are two Renaissance-era people playing chess (my nephew Actor and I are working up the 'plot" for this one).


Hans Holbein's painting, The Ambassadors is the inspiration for our personas. We're hoping to create the effect Rowling described in the books of people walking in and out of each other's portraits. So my character will be the same cartography/astronomy professor above. 

Actor will be playing another character the day of the event, so it is necessary for his chess player persona to look markedly different from his event persona.  Actor is blond, so we thought we'd give him a bit of courtier's dash and daring by darkening his hair and giving him a goatee - this picture of Leonardo Dicaprio is our guide for the make up.


We'll both be wearing the "flat cap" that was the baseball cap of that era: i.e., everyone wore them!


Since we're still in the planning stages, that's the latest so far. I will post updates on the actual making of the costumes and "film sets" as well as a few still shots of the finished characters for your entertainment later.


06 May 2011

A Summer Hat for a Wizard, Part 2


The Pyramids at Giza,
Photograph by Francis Frith, 1862
Image source
 

"The wizard hats of Giza"
Photo by me

Part 1 of this report suggested that the wizard hat making was going along swimmingly . . . oops! 

I'm afraid "One of the flayrods has apparently gotten out of skew on the treadle."* Which is to say I went off track at some point. Actually, at two points.  I tend not to use patterns when I crochet, so if something isn't looking right, I just make adjustments until it does.  And when it comes to keeping track of row numbers and stitches, I often lose track of where I am (even when writing things down as I go).  

With the yarn version, this wasn't a problem as the yarn worked up more tightly.  The resulting hat had "soft lines" and could be worked back into shape without much notice.  The raffia fiber worked up very differently.  It's a soft fiber when on the spool, but when crocheted takes on the nice stiff quality of a straw hat.  This is exactly what I wanted, but it also meant the stitch sequence needed adjustment.


"Rayon raffia ribbon - 100yds/roll, MATTE OATMEAL" sold by Gifts International, Inc., a California-based retail group.  Their price for the rayon-raffia was about $4 less per roll than what I'd found elsewhere (both locally and online).  And they had a wide range of colors.


Here's the pattern I've been working from.  It is for a small child's pointy cap.  (Click on the image of the pattern to see it in full-size -- you may need to click on the image a second time to get the largest view.)

For the first test with the raffia (pictured above next to the spool of raffia and ball of white cotton yarn), I crocheted over a strand of the cotton yarn. The raffia seemed so fine that I didn't think it would hold its shape.  It didn't take too long to see that this wasn't a problem.  (If it had been, I would have needed to switch to a cotton yarn closer to the same color as the raffia.  The cotton fiber was fatter than the raffia and showed through, no matter how hard I tried to positioned it as I worked.)

The second test produced a wonderful hat (at least until I lost track of my stitch count!).  The tight, single-crochet stitch created an slightly open texture.  When the headmaster actor saw this, he was quite pleased.  The event is to be held in late July and he wanted to be sure his hat - which he'd have on all day - wasn't too hot to wear.

Here is a close up of a straw hat of my own.  Commercially made, it is also crocheted, but with a heavier fiber.  Though comfortable, the hat is heavy to wear and gets hot after awhile.


And this is the raffia version.  You can see the openings between stitches; this will let air in.  And it is quite light by comparison to the store-bought hat.


Here is the raffia version in full.  You can see where I lost count; it bulges out on one side.  My attempt to repair that using decreased-stitches every 10 stitches or so only meant the hat now looked like a funny, large gourd!


The Headmaster actor was in town recently and we did some try-ons to see how things were working out as far as his envisioned hat. (Even with the faulty shape, we could get an idea of how things were going.)

 Original vision
The actor in his favorite straw hat - photoshopped to show cone height.

Key to his vision was the hat's height (about 12 inches from brim to top) and the cone shape (which he wanted to be very gradual, rather than pointy like a traditional witch hat). We stretched the yarn version onto the crown of the straw hat to check the overall height.  This he liked.  He told me, too, that he liked how far out the brim of the straw hat extended as compared to the yarn version.


Then we put the Test 2 raffia hat onto the straw hat. 


Despite the bulges, we could see that things were almost right!  So, now I'll start work on what I hope is the final version.  Look for that update here in a couple of weeks.


~~~~~~~~~~~~~~~~~~~~~~~~~~~~~~~~~~~~~~~~~~~~~
*  From the Monty Python sketch, "The Spanish Inquisition."  In the version posted at this link, the words "cross beams" are used instead of "flayrods." I prefer the latter. ;-)

Related Posts Plugin for WordPress, Blogger...