


The second version's making (see Part 2 here), wherein I switched over to the rayon-raffia fiber for the actual hat, revealed a few problems: the stitch count looked different in the stiffer, less flexible raffia which led me to wing it as far as counting, to not great results: the hat looked more like an old gourd! It also looked too pointy, something the headmaster actor wanted to avoid.

For the final version, I took some time beforehand to work out the entire stitch sequence on paper (the original pattern only went up to Round 15, the size that worked for a child's head size). I went back to the original stitch sequence and also decided to switch up hook sizes, from an F hook to a G hook. It made the stitches larger with the happy result of also making the very top look more rounded.

But once I got to the lower edge, and did my little trick of a row of slip stitches to make the brim stand out at a 90 degree angle . . . I realized I had no pattern planned for the brim itself. I'd recently made myself a very large, flat beret and thought I recalled the stitch sequence. Wrong! What I did made the brim look like a large, floppy ruffle: not headmasterly at all! So I did some Googling, found some free patterns that showed hats with brims, and studied their instructions. Went back to my hat, counted the stitches at the bottom, did a a few calculations, and then took the time to write out the entire sequence of rounds.
(Note to self, just because you like to freelance stitch, doesn't mean it will work for every pattern! In the case of a pointed hat with a perfectly round brim, numbers matter)
The Headmaster actor had also requested that the brim be shape-able. So along the very outer edge of it, I crocheted around a length of phone wire I'd dug out of one of our workbench boxes.

I used an old cotton tie-belt for the inner head band. It was nice and soft from use which made it comfortable. I stitched the Headmaster's last name onto it with straw-colored thread. Finally, I completed the hat with a band made from a child's old leather belt I'd found at Goodwill (shortened and with new holes punched in so that it the hat could be fitted -- The raffia turned out to be a little stretchy. The fit of the hat changes.).
I am especially pleased with the results. I managed to make something that looked exactly like what was in my imagination (and the actor's!). Here's the photoshopped pic the actor sent of his original conception.
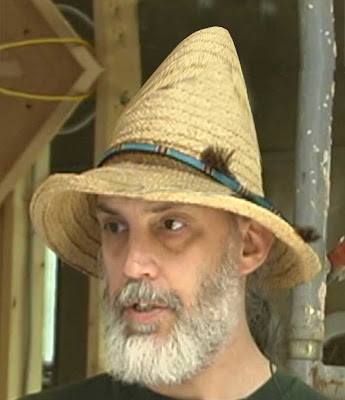
And here he is as the Headmaster with his new Summer hat!
I am especially pleased with the results. I managed to make something that looked exactly like what was in my imagination (and the actor's!). Here's the photoshopped pic the actor sent of his original conception.

And here he is as the Headmaster with his new Summer hat!

~~~~~~~~~~~~~~~~~~~~~
Note: The pattern I used is included in the Part 2 post on the project. By the final row I was increasing every 24th stitch. The brim info is not present but can be inferred from the "Brimmed 'Straw' Hat" at the Lion Brand Yarns free patterns collection.
