Showing posts with label fashion. Show all posts

29 May 2011

A Summer Hat for a Wizard, Part 3 (Finale!)


Three times is the charm, apparently.  I completed the straw hat I've been working on for the Headmaster character of the Summer Wizarding Event.  The first version (see Part 1 here) was of yarn and was a work through of a 1970s era pattern for a children's cap.  I was able to work out the height for the crown and the shift in stitch direction at the base to make the brim stick out perpendicular to the hat proper.


The second version's making (see Part 2 here), wherein I switched over to the rayon-raffia fiber for the actual hat, revealed a few problems: the stitch count looked different in the stiffer, less flexible raffia which led me to wing it as far as counting, to not great results: the hat looked more like an old gourd!  It also looked too pointy, something the headmaster actor wanted to avoid.


For the final version, I took some time beforehand to work out the entire stitch sequence on paper (the original pattern only went up to Round 15, the size that worked for a child's head size). I went back to the original stitch sequence and also decided to switch up hook sizes, from an F hook to a G hook.  It made the stitches larger with the happy result of also making the very top look more rounded.


But once I got to the lower edge, and did my little trick of a row of slip stitches to make the brim stand out at a 90 degree angle . . .  I realized I had no pattern planned for the brim itself.  I'd recently made myself a very large, flat beret and thought I recalled the stitch sequence.  Wrong!  What I did made the brim look like a large, floppy ruffle: not headmasterly at all!  So I did some Googling, found some free patterns that showed hats with brims, and studied their instructions.  Went back to my hat, counted the stitches at the bottom, did a a few calculations, and then took the time to write out the entire sequence of rounds.

(Note to self, just because you like to freelance stitch, doesn't mean it will work for every pattern!  In the case of a pointed hat with a perfectly round brim, numbers matter)

The Headmaster actor had also requested that the brim be shape-able.  So along the very outer edge of it, I crocheted around a length of phone wire I'd dug out of one of our workbench boxes.


I used an old cotton tie-belt for the inner head band.  It was nice and soft from use which made it comfortable. I stitched the Headmaster's last name onto it with straw-colored thread. Finally, I completed the hat with a band made from a child's old leather belt I'd found at Goodwill (shortened and with new holes punched in so that it the hat could be fitted -- The raffia turned out to be a little stretchy.  The fit of the hat changes.).

I am especially pleased with the results.  I managed to make something that looked exactly like what was in my imagination (and the actor's!).  Here's the photoshopped pic the actor sent of his original conception.
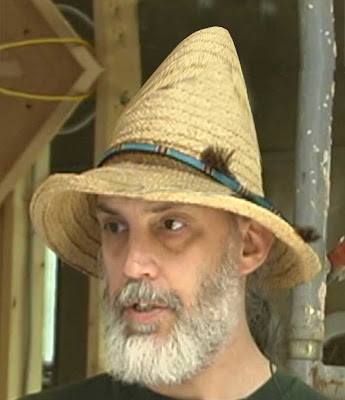


And here he is as the Headmaster with his new Summer hat! 


~~~~~~~~~~~~~~~~~~~~~
Note: The pattern I used is included in the Part 2 post on the project. By the final row I was increasing every 24th stitch.  The brim info is not present but can be inferred from the "Brimmed 'Straw' Hat" at the Lion Brand Yarns free patterns collection.


06 May 2011

A Summer Hat for a Wizard, Part 2


The Pyramids at Giza,
Photograph by Francis Frith, 1862
Image source
 

"The wizard hats of Giza"
Photo by me

Part 1 of this report suggested that the wizard hat making was going along swimmingly . . . oops! 

I'm afraid "One of the flayrods has apparently gotten out of skew on the treadle."* Which is to say I went off track at some point. Actually, at two points.  I tend not to use patterns when I crochet, so if something isn't looking right, I just make adjustments until it does.  And when it comes to keeping track of row numbers and stitches, I often lose track of where I am (even when writing things down as I go).  

With the yarn version, this wasn't a problem as the yarn worked up more tightly.  The resulting hat had "soft lines" and could be worked back into shape without much notice.  The raffia fiber worked up very differently.  It's a soft fiber when on the spool, but when crocheted takes on the nice stiff quality of a straw hat.  This is exactly what I wanted, but it also meant the stitch sequence needed adjustment.


"Rayon raffia ribbon - 100yds/roll, MATTE OATMEAL" sold by Gifts International, Inc., a California-based retail group.  Their price for the rayon-raffia was about $4 less per roll than what I'd found elsewhere (both locally and online).  And they had a wide range of colors.


Here's the pattern I've been working from.  It is for a small child's pointy cap.  (Click on the image of the pattern to see it in full-size -- you may need to click on the image a second time to get the largest view.)

For the first test with the raffia (pictured above next to the spool of raffia and ball of white cotton yarn), I crocheted over a strand of the cotton yarn. The raffia seemed so fine that I didn't think it would hold its shape.  It didn't take too long to see that this wasn't a problem.  (If it had been, I would have needed to switch to a cotton yarn closer to the same color as the raffia.  The cotton fiber was fatter than the raffia and showed through, no matter how hard I tried to positioned it as I worked.)

The second test produced a wonderful hat (at least until I lost track of my stitch count!).  The tight, single-crochet stitch created an slightly open texture.  When the headmaster actor saw this, he was quite pleased.  The event is to be held in late July and he wanted to be sure his hat - which he'd have on all day - wasn't too hot to wear.

Here is a close up of a straw hat of my own.  Commercially made, it is also crocheted, but with a heavier fiber.  Though comfortable, the hat is heavy to wear and gets hot after awhile.


And this is the raffia version.  You can see the openings between stitches; this will let air in.  And it is quite light by comparison to the store-bought hat.


Here is the raffia version in full.  You can see where I lost count; it bulges out on one side.  My attempt to repair that using decreased-stitches every 10 stitches or so only meant the hat now looked like a funny, large gourd!


The Headmaster actor was in town recently and we did some try-ons to see how things were working out as far as his envisioned hat. (Even with the faulty shape, we could get an idea of how things were going.)

 Original vision
The actor in his favorite straw hat - photoshopped to show cone height.

Key to his vision was the hat's height (about 12 inches from brim to top) and the cone shape (which he wanted to be very gradual, rather than pointy like a traditional witch hat). We stretched the yarn version onto the crown of the straw hat to check the overall height.  This he liked.  He told me, too, that he liked how far out the brim of the straw hat extended as compared to the yarn version.


Then we put the Test 2 raffia hat onto the straw hat. 


Despite the bulges, we could see that things were almost right!  So, now I'll start work on what I hope is the final version.  Look for that update here in a couple of weeks.


~~~~~~~~~~~~~~~~~~~~~~~~~~~~~~~~~~~~~~~~~~~~~
*  From the Monty Python sketch, "The Spanish Inquisition."  In the version posted at this link, the words "cross beams" are used instead of "flayrods." I prefer the latter. ;-)

31 March 2011

A Summer Hat for a Wizard, Part 1


This summer some friends of mine are putting together an immersion-style theater event for a group of 9-17 year olds.  Modeled after murder mystery dinner parties and drawing heavily on the Harry Potter books by J.K. Rowling, the event will be a day of student orientation for a new, North American school of wizardry.  As things go along, I hope to post the occasional report.  Here is the first.

The Headmaster for the day needs a proper wizarding hat.  But as the event is scheduled for July, the actor wants something in the straw hat department.  We both did research.  A quick search on Google Images using the term "wizard hat" brought up a range of styles that were Tolkienesque, Disneyesque,  Potteresque, Medieval-like, Princess-y, and Halloweenish.

Gandalf-style hat


Disney-style hat
 
Medieval-style hat


Princess-style Hat


Harry Potter-style Hat

The actor sent me some screenshots of hats worn by characters from various Harry Potter movies, but the best thing he sent was a picture of himself wearing his favorite straw hat.  He'd used Photoshop to tweak the hat into the shape he had in mind (below).


My plan was to crochet the hat as that would give me the most flexibility in terms of shaping the hat while it was in progress.  I found several possible inspirations for my approach.  Lilli at Hawdancing Studio makes some fantastically colored witch hats:


For my purposes, the best thing about Lilli's design was the wide, flat brim (she put wire around the outer edge to keep the round shape).  The pattern was a bit too pointy, though.


Cheryl Oxsalida designed a more traditional witch hat (above). That pattern is here

Another idea came from the long, cone-shaped stocking caps that were popular when I was a kid.  


In the end, I found my working pattern in the fat, 3-ring binder I have used over the years to archive design ideas I come across.  The pattern was one I'd found in a British book of crochet designs -- the title of which, unfortunately, I failed to note when I copied the pages some 12 years ago. The pattern was for a series of cone-shaped caps for children.  Reviewing the stitch sequence,  I realized the hat was likely to be too big too fast at the base and began modifying things right away.

I decided I had to test drive the pattern first.  To do that, I used some art yarn I'd been given as a gift. 


The original pattern called for an increase of 8 stitches every third row.  This made a nice cone shape (see blue child's cap above), but the pitch of things was too steep, too much like a traditional witch's hat.  So I modified the pattern to increase 10 stitches and played with just when to do that: every 3rd row, or every 4th row, etc. 


Here's Version 1. 

 
I used a slip stitch along the bottom edge of the cone to "change direction" and allow the brim to be perpendicular to the hat.


But when put on a head mannequin, the base began to stretch around the round top of the skull.  The headmaster actor had asked that the hat be cone-shaped all the way to the brim.

Part 2 of this series will show the next version of the hat (am hoping I need to make only three to get things right).  I will also post the instructions in the final post.


04 October 2010

Fashion . . . Oh, Now I Get It, Sorta


I have a friend, Vienna, who is totally into fashion as Fashion.  I never understood this, despite my background in theatre set and costume design and despite the fact that I have designed and sewed clothing for myself since I was 13.  The fundamental and intensely playful-creative quality of Fashion always passed me by.  I think that may be due to the high couture magazines that go for the big money approach where Fashion = Style = Prestige.  That big, fat Fall issue of Vouge magazine just keeps getting more boring.


So I was delighted to have upon NOTCouture, an online amalgamation of fairly high level stuff that somehow, in its collective presentation, seems more silly, witty, and just plain out there in a way that appeals to all levels of my imagination.


Nonetheless, the image being put across is still gotta-be-young-ultra-thin-uber-moneyed, which seriously detracts.  The conflict is always a dilemma.


[from the NOTCOT About page]: "WHAT IS NOTCOT? Design Network of sites reaching over 5 million pageviews monthly. NOTCOT Inc is a growing network of design sites currently including NOTCOT.com and innovative community contributed sites NOTCOT.org + NotCouture.com + Liqurious.com (+ previously TasteSpotting.com).

NOTCOT is a visual filtration of ideas + aesthetics + amusements. NOTCOT's two sites have become the daily sources of inspiration for creatives everywhere, fighting the good fight against "creative block" since 2005 with visually stunning imagery, the latest in international trends, and a passion for all things well designed.

NOTCOT.ORG is a community of creatives, design lovers, and trendsetters - where .org serves as the studio bulletin board gone digital - each image and caption brings you to a place worth visiting. It's about sharing what inspires you.


Related Posts Plugin for WordPress, Blogger...