Showing posts with label planets. Show all posts

09 December 2011

Worlds of Our Own, Finale

. . . continued from the previous post. (Part 1 can be found here.) 


After the last (4th) coat of chalkboard, the Planeteers, holding the final version of their globes, re-create their pose from Day 1. Then we got down to the final doings.  

First up - after a little goofing around - they boys removed the tin foil that protected the globes' metal parts when we were painting.


The directions on the box for the the paint stated that after the final coat cured for 3 days, one had to prepare the surface by rubbing chalk all over it.


It took almost two entire pieces of white chalk to cover the globes completely.


Then, the chalk was rubbed off. (We used heavy cotton rags that had once been an old bedspread.) The remaining surface was pretty smooth - not quite like an old fashioned slate chalkboard, but nice.


Then the 2 Planeteers began to create their new worlds!


It was a challenge at first; the chalk didn't create as fine a line as Boy1 hoped.  He wanted the names of the continents and islands to be smaller, like on a real globe. Boy2 started with the landmasses first. A few days later, the creations were complete.


And here we have a final pose, and a list of the new lands of one of the Great Chalkboard Planets.


05 December 2011

Worlds of Our Own, Part 2


In a fairly recent post you got to see the first stages of The Great Chalkboard Planet Adventure with my two nephews.  These past two weeks we finished things up.  

After the primer coat of flat, white latex/acrylic paint dried for a few days, we began with the chalkboard paint.  We used the Rustoleum brand because it comes in a range of colors that get mixed at the point of purchase.  Since Boy1 wanted dark red, I was able to ask the Paint Tech to change the color formula slightly.  (Many thanks to Adam at Menards for this!)


Earlier this summer when working on a different project, I had tried a different brand - can't recall the name.  I bought it at a local artist supply store.  It came in a small, 8 oz. plastic canister and was a deep royal blue shade.  As with our globes, I put down a primer coat first and then two of the chalkboard paint.  It looked good, colorwise, but the surface was a little shiny and didn't take the chalk very well.  Since then I've learned that there are numerous brands out there.  I can't speak about them (and Rustoleum isn't paying me anything to talk them up here!).


The pics above show the globes after two coats of paint.  The dark green paint seemed to have better coverage, though it was also a matter of how each boy applied their color.


We'd used brushes for the primer coat but switched to small foam rollers for coats 2 and 3 so that the surface would be as smooth as possible.  Foam Pro was the brand.  The fine-grained foam is often recommended by artists doing wall murals or trompe l'oeil creations.


For the final coat, we used both roller and brush.  Each boy rolled the top half of the globe first.  Then I used a brush to smooth out any heavy edges or line.  Then, I held each boy's globe upside down for him while he paint-rolled the southern hemisphere.  Finally, I smoothed those sections and did some gentle brush-smoothing along the equators to even out the two halves of paint.


Above you can see how much lighter the wet paint looks when being applied.


Here you can see how the paint begins to darken as it dries.


And here you can see what happens when one of the 
artists leaned too close to his paint tray!


The Planeteers re-create their pose from Day 1.

The final report on The Great Chalkboard Planet Adventure will be the next post (4 days from now).

15 November 2011

Worlds of Our Own, Part 1


My always fun and creative nephews and I have been on the hunt for a new project.  (This past summer they designed their second dinner party for family members: a menu of 4 courses, all the cooking, and table decorations including menus typed up on a manual typewriter and hand illustrated!)  So when I saw the following image some months back, we knew we had something.


We would make our own planets!!

Getting the project off the ground took some doing.  Who knew that just finding some old globes would be a project in itself?  Our local Goodwill shops had nothing.  Plus I was thinking they'd be relatively cheap.  No way, Ray!  Instead, I ended up bidding on numerous eBay globes.  I thought I'd struck gold with one, only to find the seller was less than accurate in the description.  The globe didn't spin and its surface was all torn up.  Fortunately, I found a couple more and they arrived in reasonably good condition.  


A local Craigslist ad filled out our needed globular number and then some.


I ended up with SIX globes!  Fortunately, my brother Architect and his daughter Hoja are thinking of a redux of the Summer Wizarding Event.  They are thinking that the Headmaster's Office set needs more by way of excellent, wizardy occupational study stuff  -- such as clocks and globes and such.  So he's offered to buy up my extra Earths.


Last weekend, the neffers and I began our Planetary Adventures.  Fortunately for Galactic Peace, each had a liking for a different globe; so I didn't have to set up a rock-paper-scissors contest to work out which globe went to which boy!

  
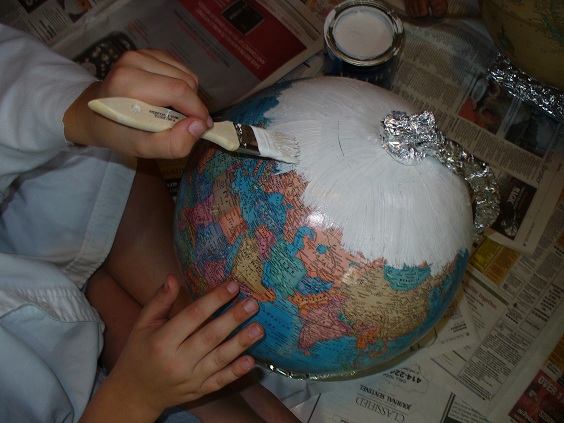
We set out materials for Round 1 - which would involve covering the not-to-be-painted parts with aluminum foil and then applying a coat of flat latex acrylic paint as the primer coat.


But first, knowing things were likely to get messy, we made up some painters' smocks.  My Beloved Spousal Unit and I both had some dress shirts destined for the rag bin - these were donated to the Great Chalkboard Planet Adventure.  I had the boys try them on and then cut the sleeves to a workable length.  Then I labeled them with the name of our creative "team" -- Planeteers -- and added their respective uniform numbers (their ages). Their Mom also had them change into shorts so their good jeans wouldn't get paint on them.

The painting commenced. We worked on the table first and then made things more comfortable by shifting to the floor.


After a good thirty minutes, the first coat was complete and we set them aside to dry.  


We finished our afternoon together enjoying a video and a book I'd brought along.  Shaun Tan, an Australian artist, is someone I introduced the boys to earlier this year when I read them Tan's poignant and fantastically illustrated graphic novel The Arrival.  


This time, we looked at The Lost Thing. We read the book first and then looked at the 15 minute film.  They liked it a lot and we found ourselves looking through all the DVDs extras that showed how the various characters were rendered and the different music chosen.


Mr. Tan won an Oscar for this film. You can find more info on it (and how to get a copy) at this page on his website.  NOTE:  The DVD may not play on older DVD players as it has regional limitations.  We had no problem playing it on the boy's Mom's laptop - but it would look so much better on a larger screen.  The animation and illustrations are just fantastic.


Related Posts Plugin for WordPress, Blogger...