

Image source
I used Pixlr-o-Matic, a web or downloadable app that lets you turn your photos into cool looking retro snapshots, to further enhance the portrait of Madame P. It has three options - you can use one, two, or all three.
I opened the portrait pic and played with the color (in these examples I am using the original image as it is easier to show what Pixlr-o-Matic does).


Moving the picture bar below the photo tray alters the image.

A few of the cast from this past summer's wizarding event got together for Movie Night recently. We thought it would be fun to attend in costume. (I came in my incarnation as the Irish Scholar Lady descended from the Travellers of Eire.) Which made me think that it would be even more fun if there were an Owl Post delivery at some point during the evening.
First, there was a message from the wizarding event's Pony Express courier. Since I was sitting right there in my "Irish Scholar" persona, I had to come up with some way of delivering the message without having to change costumes.


(L) as Irish Scholar (R) as Pony Express courier
So after dinner and before dessert, I brought out the wee hand-held digital recorder I used to record my eLearning lectures when I taught Information Organization at the University of Pittsburgh. Earlier in the day, sitting in my car in the parking lot of a nearby Walgreens, I created a greeting from my courier character. Scholar-Me announced to my wizardy colleagues that I had been asked to share something and turned on the recorder.

In the message Courier-Me apologized for missing "the evening's fancy soiree" but that I was "at that moment enroute on an express delivery" to our Wandmaster with "critical components" for his work. (Our Wandmaster, played by my brother Woodcrafter, lives in the Pacific Northwest.) I noted that I had, in fact, been by the Headmaster's residence earlier in the day and, via the wonders of magic, left their mail delivery in a bag underneath the futon couch in the main room.
Much delight ensued as the mail I -- now back in my Irish Scholar role -- retrieved the mailbag and handed out the its contents. One of the recipients was "Madame P" (as I shall refer to her here). Here was her letter.


TRANSCRIPTION
And here is Madame P's package. Note the postage stamps; just like those on her letter, from Magyar (aka Hungary).


STEP 2: Coloring the Image

All the rest of the magic happened using a combination of Microsoft Word's Pictures Function and a free program called Pixlr-o-Matic. I first changed the image color to brown by inserting it into a Word document and using the Picture Tools. (No doubt Adobe Photoshop could be used for this, but as it is an expensive program, I do my little workarounds with the software I have!)


First, there was a message from the wizarding event's Pony Express courier. Since I was sitting right there in my "Irish Scholar" persona, I had to come up with some way of delivering the message without having to change costumes.


(L) as Irish Scholar (R) as Pony Express courier

This is my recorder (SONY ICD-P520).
A newer version has come out since.
A newer version has come out since.
In the message Courier-Me apologized for missing "the evening's fancy soiree" but that I was "at that moment enroute on an express delivery" to our Wandmaster with "critical components" for his work. (Our Wandmaster, played by my brother Woodcrafter, lives in the Pacific Northwest.) I noted that I had, in fact, been by the Headmaster's residence earlier in the day and, via the wonders of magic, left their mail delivery in a bag underneath the futon couch in the main room.
Much delight ensued as the mail I -- now back in my Irish Scholar role -- retrieved the mailbag and handed out the its contents. One of the recipients was "Madame P" (as I shall refer to her here). Here was her letter.

The envelope & letter were typed on an Olivetti Traveller Deluxe.
All five letters delivered came from various international divisions of the ACME Corporation. The name "ACME" was inspired by the company of the same name from which Wiley the Coyote of the Roadrunner cartoons always received his extravagant contraptions. I named each division according to the type of item in each person's postal package.
I created the letterhead using Microsoft Word. (In a new series beginning in April -- on the creation of Fictional Correspondences -- I will demo how to make this style of letterhead stationery.)
I created the letterhead using Microsoft Word. (In a new series beginning in April -- on the creation of Fictional Correspondences -- I will demo how to make this style of letterhead stationery.)

TRANSCRIPTION
ACME Portraitmaster Limner Extraordinaire CompanySait Paprika Plaze17.3 Vajdahunyad StreetBudapest 1057, MagyarorszagEUROPAMadame B--------- P---------Trolley Cart - Main HallThe North American School -- W----------- --- W-----------Middle Region of the Northern Western Hemisphere10 March 2012Dear Madame P---------:The limners of the ACME Portrait Master Division (Magyar) are pleased to send you (via separate OWL POST delivery) the first-ever, wizard-crafted faux mugglesque daguerreotype. This framed collectible is the result of technological innovations in the creation of photograms at the labs of ACME and the KODAK-FUJI companies.Should you have any questions about your daguerreotype or wish to register for certification by our ACME Official Photograms Department, please complete the online form at our website: http://ACME*Images.org/Magyar.Very truly yours,Andrea BaranyatLimner, 3rd Class
And here is Madame P's package. Note the postage stamps; just like those on her letter, from Magyar (aka Hungary).


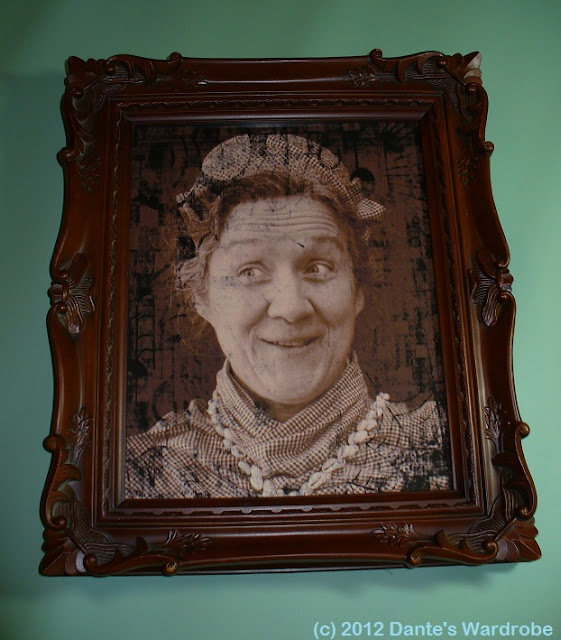
And here is Madame P's formal portrait itself.

~~~~~~~~~~~~~~~~~~~~~~~~~~~~~~~~~~~~~~~~~~~~~~~~~~~~~~~~~
How I Made It

Picture frame image from ShopGoodwill
STEP 1: The Frame
Knowing I wanted to make the image look old fashioned, I first went to Goodwill (several times, actually) to find a suitable frame. I had no idea what I'd find, of course, but hoped I would find something elaborate. I saw several (which I bought for later projects) but none quite fit my idea. Then I lucked out, and found the one you see in the completed portrait image. Perfect! In good condition and only $2.99! It was missing its glass, but I traded out a pane from one of the other frames.
STEP 2: Coloring the Image
Now that I had the frame, and knew it's color, I could proceed with creating the portrait. I had the image file that had been created midsummer 2011 when we were taking our imaginary faculty's formal pictures.
Here's the original pic.

All the rest of the magic happened using a combination of Microsoft Word's Pictures Function and a free program called Pixlr-o-Matic. I first changed the image color to brown by inserting it into a Word document and using the Picture Tools. (No doubt Adobe Photoshop could be used for this, but as it is an expensive program, I do my little workarounds with the software I have!)

Here you can see where I clicked to change the image color.

Here you can see how to save the image as a picture file
(right click on the image to get this drop down menu).
STEP 2: Altering the Image
I used Pixlr-o-Matic, a web or downloadable app that lets you turn your photos into cool looking retro snapshots, to further enhance the portrait of Madame P. It has three options - you can use one, two, or all three.


Moving the picture bar below the photo tray alters the image.

In Step 2 you can add special effects. Some are designed to look like old camera effects such as a light leaking onto the film. Other options add sparkles and such.
In the final option, Pixlr-o-Matic lets you add retro framing.

Here are two versions of Madame P's portrait that I worked up but decided not to use.


The left image looked good on a small scale, but when enlarged to an 8x10 print, the effect was too "cartoony." The right image, when enlarged, looked too faded and bright for the dark wooden frame.
In the end, I used the brown-tinted image and only the first and third steps of the Pixlr-o-Matic options. The result was an antiqued image with some wizardry flourishes and spiderwebs around the outer edges of Madame's face.
The actor, herself, was utterly delighted when she opened the package. It seemed to capture Madame P's personality, she thought, as well as echo the woodsy and sprite-like aspects of the back story the actor had invented for her.
